|
|
|
Usuarios conectados
Actualmente hay 5665 visitantes online. |
|
Productos
|
|
Información
|
|
Destacado
|
|
|
 |
|
|
No hay comentarios de productos.
CD-C3H/CP-C3H
REMOVING AND REINSTALLING THE MAIN PARTS
CD MECHANISM SECTION
For the procedure to remove the CD mechanism from the main unit, refer to Disassembling Procedure, Steps 1~10, and 19. (page 8).
(A1) x2 ø2.6 x5mm Stop Washer (A3) x1 Pickup CD Mechanism
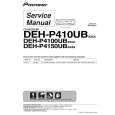
How to Remove the optical pickup (See Fig. 11-1.)
1. Remove the screws (A1)x 2 pcs., to remove shaft (A2)x 1 pc. 2. Remove stop washer (A3)x 1 pc., to remove gear (A4)x 1 pc. 3. Remove the optical pickup. Note: After disconnecting the optical pickup connector wrap the front end of connector in conductive aluminum foil so as to prevent damage to the optical pickup by static electricity.
Gear (A4) x1
Shaft (A2) x1
Figure 11-1
How to Remove the tray motor/main cam motor (See Fig. 11-2.)
1. Remove the CD changer section by the method described in page 8, and disassemble as shown in the figure. 2. Remove the belts (B1)x 2 pcs., from the motor side. 3. Remove the screws (B2)x 4 pcs. 4. Remove the tray motor and main cam motor.
(B2) x2 ø2.6 x4mm Belt (B1) x1
(B2) x2 ø2.6 x4mm
Belt (B1) x1 Main Cam Motor Tray Motor
Figure 11-2
How to remove the CD disc (When CD is in playback state) (See Fig. 11-3.)
1. Remove the Top cabinet . 2. Disassemble as shown in the figure so that the CD disc of CD changer becomes visible. 3. Remove the CD disc as shown in the figure.
Disc Holder CD Disc
Turn the main cam clockwise, and raise the CD mechanism and disc holder up to uppermost position.
CD Changer Block
(When CD is in playback state.) Figure 11-3
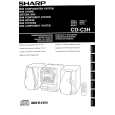
How to remove the CD disc (When CD exists in the tray) (See Fig. 11-4.)
1. Remove the Top cabinet. 2. Disassemble as shown in the figure so that the CD disc of CD changer can be taken out. 3. Remove the CD disc from the tray as shown in the figure.
Disc Holder CD Mechanism CD Disc
Turn the main cam clockwise, and raise the CD mechanism and disc holder up to uppermost position.
CD Changer Block
1 2 3
Press in turns the arrow parts, starting with the uppermost one, to withdraw the disc trays
Disc Tray 1 Disc Tray 3 Disc Tray 2
(When CD exists in the tray) Figure 11-4
� 11 �
|
|
|
> |
|